
Barbara Close taught her students how to make a folded pen, also known as a cola pen (yes, as in soda pop). A fellow student, Juan, graciously posed for the step-by-step photos.
- First we cut the strip of sheet metal Barbara supplied according to a pattern:

Hand-made folded pen, shape to cut
2. We put the pattern on the sheet metal and cut it out:

Hand-made folded pen, cutting out nib with pattern
3. Here is the piece once it was cut. It is still unfinished:

Hand-made folded pen, metal nib cut out
4. The piece is then folded around a dowel. A pencil works just fine! So now you know where the “folded” part comes from:

Hand-made folded pen, folding metal around handle
5. On the paper pattern, we draw the outline of the final shape and place it around the sheet metal to cut out:

Hand-made folded pen, cutting nib into final shape
6. Here is the piece on the pencil, tightly crimped to stay put:

Hand-made folded pen, metal folded into place
7. We added plenty of tape to hold the nib in place:

Hand-made folded pen, tape being attached
8. Here is the final piece, ready to dip in your favorite media and use:

Hand-made folded pen, finished
I had created a pen a year earlier, but the metal was from a soda can. So that’s where we get the name cola pen from:

Hand-made Cola pen forged from a soda can
For homework, I used the pen to create a word in a sentence. Here’s the project I turned in. I used the cola pen to write Glory with green ink, then used a broad edge pen to write the top lettering in gold gouache. I applied colored pencil and pastels to the piece to brighten it up. I applied the pastel with a stick containing Q-tip-like ball on the end. (Pastels and sticks came from Stampin-UP! It is no longer in production.)

Psalms 102.16, using broad nib nib and cola pen
Barbara had announced that a library in Whittier, CA will display calligraphy pieces during the month of November. Since it is the month of Thanksgiving, it had the theme of gratitude. I had an idea at the last minute (well, after the last minute — so it will be put up after the showing starts), and borrowed the idea above to create the artwork below:
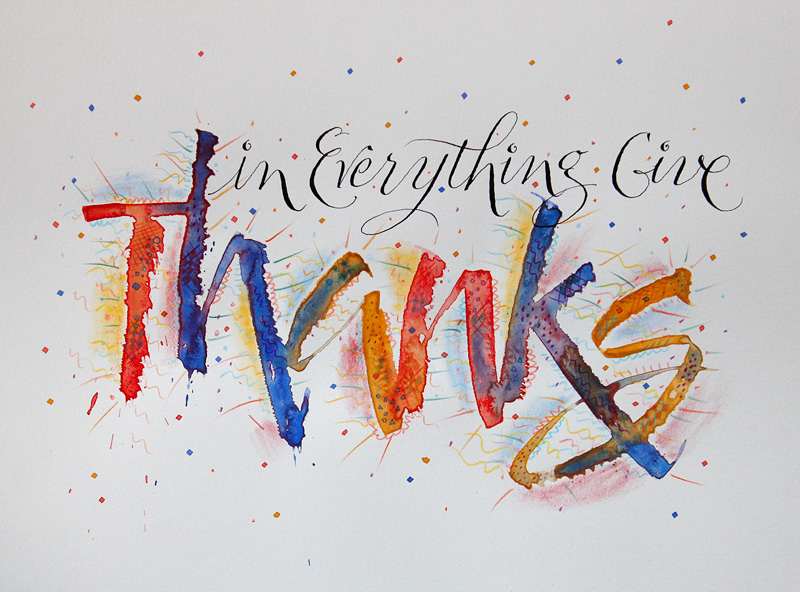
In Everything Give Thanks, with pointed pen nib and cola pen
I dipped the cola pen into a tray of red gouache and formed the T. I cleaned the pen and dipped it in the blue gouache for the h, cleaned it, and so on through the word. Because it was so watery, the colors merged where the letters overlapped. Then I applied pastels and colored pencil around it. The top lettering was done with a pointed pen with Moon Palace Sumi Ink.
Now I’m off to find a frame for it!
2 Responses to Making a folded pen or cola pen