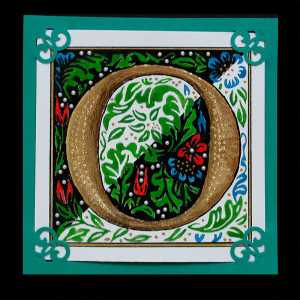
The last few classes of Barbara Close’s workshop in November were spent learning gold leaf gilding on an intricate illuminated letter. We transferred found fancy artwork to our papers and added the color and gold leaf. I found this pattern on the Internet and it became my project.
The O itself is 3 1/4″ high. I believe most of the students used a brush to color in their work, but I thought, “why use a brush when I can use a tool I’m already familiar with?” So I used a Speedball B6 nib, which was fine enough to accurately color the intricate details.
The gilding was done first because if we added paint first, then the gold leaf would stick to the paint as well as the Instacoll adhesive for the letter. I used heavy watercolor paper to minimize the amount of paper warping. I added the gold to the Instacoll, then while the Instacoll was still soft, I poked lightly with a pencil tip up and down both sides to add texture.
I added the color next, using gouache tube paint, transferring the paint to the nib with a small, flat brush. After that, I added the black with Moon Palace Sumi ink, carefully hugging the colored areas. Originally, the background was going to be all black, but I thought I’d try this white/black design first, and I decided I liked it. Besides, it also meant I finished early!
The artwork has round design dots scattered throughout the piece, so I thought it would be a perfect opportunity to add Stampin’ UP! self-stick faux pearls. These come several sizes to a sheet; I applied the smallest ones to the black portion of the artwork. For the rest of the dots, I applied a gold gel pen, and used the pen to apply gold to the outside boundary. (I used a triangle and Speedball nib to draw the black boundary lines, being careful not to get the nib too close to the triangle lest the ink bleed under.)
After everything was dry and it was safe to do so, I laid a glassine envelope (which housed the gold leaf) over the gilding and rubbed with a bone folder to smooth out the gold. However, I don’t have the knack for this yet, for the gold still looked rough with fine wrinkles after my session of rubbing. That’s one “wrinkle” I haven’t worked out yet. I probably need to have more patience with the rubbing and stopped too soon.
I wanted the project to have a finished look, so I used our Stampin’ UP! materials to make a card. I used a punch to cut the four corners of the green paper and poked the artwork corners in. I cut the black paper, folded it in half, and glued the green part to it. Lastly, I added a folded smooth white paper inside to receive a message.
I was tremendously impressed with the projects by the other ladies. They were a terrific inspiration for me to do this. Originally, my first project was simple and I stopped when I was done. I thought I would try an idea for a 16 x 20″ project next, but after seeing their finished and near-finished work the following week, I thought I would try harder and do a more involved piece so I’d have the experience under my belt. I’ve never spent a lot of time with intricate details like I did with this O piece, and I’m glad I did.
If you want excellent teaching on using gold leaf, you can’t do better than to watch Master Penman Harvest Crittenden’s video at http://www.acornarts.org/videos.html. Following are my notes on gilding:
- Don’t shake it the Instacoll bottle, but rotate it upside down and rightside up over and over to mix. If any is still on the bottom, stir it gently with the wood end of paint brush to mix it. (I just used a screwdriver – it was easy to clean afterward.)
- Then pour a small amount into a small cappable bottle for use.
- Tools: Instacoll, distilled water, mixing cup, small spatula, blush brush, Q-Tip for burnishing.
- Harvest uses 140lb hot press watercolor paper.
- 23K Patent gold book (gold leaf) is easier to pick up and handle. She recommends Wehrung & Billmeier Co. brand, which is what I used.
- Add several drops of water to the Instacoll after pouring it into a small, cappable container.
- Dip #10 brush into Instacoll and touch on paper.
- Push the bead of Instacoll to cover the area. Don’t paint with it or it’ll be spread too thin.
- When dry, it’s still shiny, but mottled. Can test by lightly rubbing the side of the little finger over it, not the top (we don’t want to leave fingerprints or oils).
- Lay the foil over the Instacoll, press over the whole surface, and lift.
- There will be pieces of gold torn away around the edges. Use a blush brush to brush away the gold around the figure. Do this in a still, not breezy area, for the gold reacts to the slightest breeze!
- Lay Q-tip flat against the foil (never point down) and rub over it all to burnish it.


