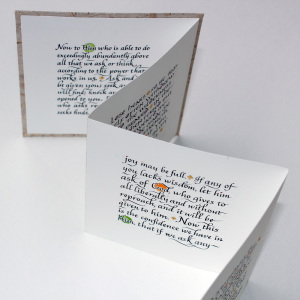
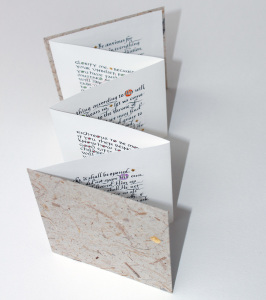
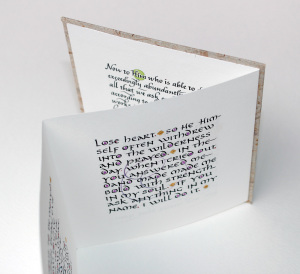
I had a 30″ x 5″ strip of paper left over from my last class homework’s accordion book (previous post). I had cut it to use as a backup in case I needed to redo. I decided to turn it into a book of prayer promises for myself. Here are the steps I took to create it.
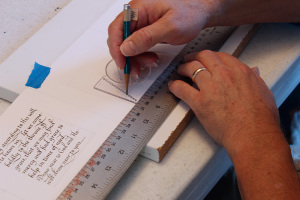
I marked off each 5″ panel, then each of their 1″ borders all around. I then used the Ames lettering guide/parallelograph tool to draw the horizontal guidelines: I lined up the T-square with the border lines, then lined up the topmost hole of the row of holes on the left (slanted) edge of the Ames so it tracked straight all the way across two panels (my desk space was too small for all six panels). I inserted my 4H pencil into the second hole from the top (the top one was used to line up the tool with the top border), and gently slid the tool from one side to the other, carefully pressing the tool against the straightedge with my pinky so it didn’t shift. I included a photo showing this.
The 4H pencil came from my drafting days. You had your B pencils, which got softer and darker the higher the number, and your H pencils, which got harder and lighter the higher the number. So the 4H, once sharpened, preserved its point through many lines. Because the 4H pencil is so hard, you have to take care not to press hard or you’ll leave indentations in the paper. If you habitually have a “heavy hand” when lettering, then you’re better off with a mechanical pencil – they are great with the Ames. The lines were .10″ to .12″ (1/8″) apart.
(I could have used my parallel ruler to make the lines; it slides up and down on two rubber wheels. I could have marked off the lines by ticking them off the edge of a ruler, then using my T-square against a straight board to rule the lines. But using the Ames was just too easy – the spaces were spaced apart evenly at the distance I wanted. I don’t have a portable drafting board at this time – perhaps a future purchase.)
I already had a list of Bible references to prayers at the back of my Bible to choose from, which I had accumulated over the years.
I used Moon Palace ink (because I had a large bottle of it) with a 2mm Brause nib for all the lettering. I’m embarrassed at the amount of errors I made. With one exception, I tried not to fix any of them; so none of them stand out. The one exception was inserting a missing lowercase L between two letters, so that area looks cramped. Another mistake was not cleaning my nib often enough. When I came back to the project the next evening to continue, I found my new strokes thinner than the stokes in the line of text before. Too different. However, I did cover the paper with thick watercolor paper where my hand rested, so I did not impart any oils or discoloring. It was a bit hot at times, so it was important to keep my sweaty hands off!
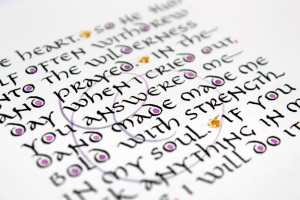
I did one side in swash Italic over all six panels. I did the second side in Uncial on the four inner panels, leaving the two end panels blank, because they would receive the cardboard covers. I eased the lines with a white vinyl eraser.
(There is a black eraser that’s ideal for black paper; and there’s a kneaded eraser that can be reshaped to erase exactly where needed and doesn’t leave much in the way of crumbs. There is also an eraser shield; it’s similar to a circle template, except it is very thin, usually metal, and has various shapes cut out; you place the cutout over the line to be erased and erase through the holes, the shield protects the surrounding artwork.)
I wanted to add decoration and color. With the Uncial side I added a different looping flourish of translucent black per panel, then overlaid it lightly with colored pencil. I also added watercolor to the interiors of the O’s and D’s, not with brush but with my pointed pen for more control. After all, the letter x-height was no more than 1/8″ high. (Don’t forget to click on the images to see a larger size.)
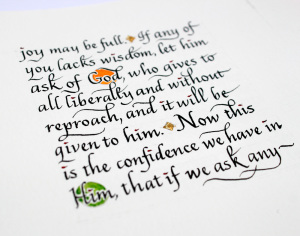
On the swash Italic side, I added 3/8″ circles over the pronouns for God with my circle template and 4H pencil, then colored the inside with the same colors and pointed pen as on the other side. I had chosen four colors and applied a different color per panel on the Uncial side; here, I mixed up the colors across the whole six panels.
Question was asked: “How did I avoid colliding ascenders and descenders?” I drew the ascenders down part-way, without the swashes. Then I did the next line of text. Then I went back to the upper line of text and added the descender swashes where there was room. As I made the ascenders in the lower line, I kept in mind the space needed for the nearby descenders in the upper line, and made the ascenders accordingly. Sometimes I had to arc the ascenders to the right sooner rather than later when they were right under a descender; it all worked out well.
After that, I applied gold leaf to separate the verses (video instruction on this page). I used a square template and my 4H pencil to draw the squares, then applied the Instacoll adhesive with a toothpick (so I wouldn’t have to clean any brushes). I goofed, having forgotten to add water to thin it. I waited 15 minutes for it to dry, then applied the gold leaf sheet, then brushed away the spare pieces with a blush brush.
For the covers, I cut two square pieces of cardboard to 5 1/4″ each so they would overhang a little all around, then cut a specialty paper sheet (containing embedded wood chips or bark) of two 6 1/2″ square pieces, then cut off their corners. (When the book cover is overlaid on the cover paper, you cut the cover paper corners so they are 1/16″ away from the book pages’ corners.) I sprayed the paper with Elmer’s Craft Bond Spray Adhesive then attached them to the cardboard, folding each side over neatly. I applied Elmer’s white glue to the blank paper ends on the Uncial side, spreading it thinly by wiping a small sheet of scratch paper over it towards the edges, then attached the cover pieces.
After that, I applied one more diamond of gold leaf to the front piece to indicate it’s the front cover and where to open it (see following).
The pictures show the project as it is now, after all the above steps (although just now I see that I missed coloring in a circle!) I would like to try adding some marks in the border areas; that’ll be my next step — if I choose to take it.

